Friday, September 7, 2012

New Arrival

I'm very pleased to announce that I'm not pregnant anymore!  Little Troy Robert Conrad was born on August 23rd at 1:50am - 2 1/2 weeks earlier than expected.  He announced his 8lb, 20inch long presence into the world with a very loud scream.  What I would come to know is that le bebe is very sensitive to temperature fluctuations, especially those experienced during diaper changes.  Not a fan.  Hence, very loud crying.  

Most of the time he is a quiet little contented angel.   

But when he is unhappy with something, he definitely lets you know...along with all of your neighbors!

I will now commence with the dramatic tale of Troy's birth (okay, it's not that dramatic) so for those of you who just wanted to see a cute picture and skip the details, I would suggest checking out now.  For those of you who like the gory, yet abridged, story - here we go...

First, I have to give a little back story so everything makes sense.  I was 36 weeks pregnant when I went in for my regular appointment with the OB on a Thursday and she noticed that my blood pressure had started to rise.  So she ordered some blood tests for me and sent me home for the weekend with instructions to take it easy and come back in on Monday for a follow up.

That weekend, the family and I decided to take a little vacation and stay with my Aunt and Uncle at their cabin in Cypress Hills.  We had a fabulous time where I kayaked (not an easy feat. when you are grossly off balance) and even tubed (a nice slow ride with Russ).  We often joked to my Aunt and Uncle that I was so pregnant, I would end up having the baby right there at the cabin.  While it would have made for a good story, I am happy to say that I did not go into labour and we had a wonderfully relaxing time belly and all.

We came home and I immediately visited the OB who, after expressing some concern with my continued high blood pressure, very calmly and matter of factly finished with,"...and that's why I think you should have the baby this week.  How's Thursday for you?"  While I knew that an induction was possible and even likely, I didn't think it would happen quite that soon.  Nevertheless, we scheduled the induction and then frantically went on a shopping spree to buy all of the things that we needed that we had planned to buy in the next three weeks all in one night.

Thursday came quickly.  The induction was scheduled for 11am so we showed up bright eyed and bushy tailed, ready to pop this baby out.  This was going to be a snap, right?  Not so much.  Apparently  there were a lot of women who were already in labour who needed more attention than me.  How dare they mess up my schedule!  But seriously...they totally did.  After 8 HOURS of waiting - I repeat, 8 HOURS of waiting, we finally got the green light to be induced.  Did I mention we had to wait 8 hours!?
Ken's waiting position

They broke my water and started me on the oxytocin drip which really got the party started and fast.  Within 15 minutes I was having regular contractions and they were starting to get incredibly intense.  Now with Russell, I had a six hour all natural labour but this felt much different.  So after about an hour of increasingly intense contractions, I asked for an epidural.  I tell you, once that epidural started working, I promptly gave Ken permission to fall asleep in the corner and nearly dozed off myself.  I say nearly, because I could still feel the contractions and they kept me awake.

About an hour and a half later, I felt a great amount of pressure down you know where and knew that it would soon be time to push.  I will say that it was strange not to feel that overwhelming urge to push like I experienced with my first labour.  With the epidural, I knew when I was having a contraction and felt pressure but I certainly didn't feel any overwhelming urge.  It was pretty strange feeling.

I yelled at Ken to wake up and 30 mins of pushing later, little Troy popped out and promptly started screaming as they placed him on my chest!  It was very surreal.  I could feel the emptiness inside that Troy used to occupy and felt incredibly liberated in knowing that he was finally out, I had my body back and a new little life to bring home.  It was amazing how alert and fully aware I felt in that moment - a feeling that I did not experience with Russell because I was just so damn tired.  I didn't feel like I was just hit by a bus, which was a pleasant surprise.  Not so pleasant was the fact that I tore down the entire scar line where I had torn with Russ.  Not cool.  Nevertheless, I had a beautiful, healthy baby boy which made the tears seem irrelevant.


Russ stopped by the next day and didn't really seem all that interested in holding the baby.  We had to bribe him with a game of angry birds just to take a picture!  Oh well, the boy sure sold it well!


Now we're home, enjoying this perfect little human being and Russ has really warmed to the little guy, bringing him blankets and soothers, teddy bears and even his coveted angry bird stuffy.  Now that's love!

Just think, I've had Troy at home with me for 15 days now when, if he chose to come on time, he would be due TODAY.  Thank goodness he came early!

-J

Monday, July 16, 2012

Home Stretch

Who knew that it would be so much work to paint stripes on a wall?  Apparently, everybody but me.  However, after 6 hours of prepping/patching the walls and painting them in two coats of white. 4 hours of measuring and taping out the stripes and another 4 hours of repainting the "bleed line"in the base color (to get a nice crisp line) and filling the stripes with the top coat gray I am finally done!  Well, sort of.


Since the walls are 8 feet high, I decided on a nice even 12 inch stripe which gave me 4 stripes of each color.  Then I moved the baby stuff into the room deciding upon blue and green accents.  Here's what I got:

I still have to find/make some cute artwork to add more color to the walls and put up curtains but I am now on the home stretch.  I have 7 weeks to get this sucker done but for now I think I shall take a short break to nurse myself back to health as I can't seem to get rid of this nasty cough and cold I have contracted.  Time for some much needed R&R...and then I'll get back to work.  

-J

Saturday, June 2, 2012

Dresser Redo

Ken just started a rotation as a drilling manager of a rig way up in Northern BC and would be gone for two weeks so I figured I should do some sort of project to make the time go faster while he was away.  I settled upon painting a dresser for the baby's room since we needed one anyway.  The timing was perfect as my community was having garage sale day so I scoured every garage sale and found a dresser that I thought would work as a change table and storage piece in the baby's room.  I picked it up for $30 and with a little help from family brought it home to the garage.  It was kind of ugly but I thought it had good potential.  I forgot to take a before picture with all the drawers and hardware installed so you'll have to visualize it all put together!

Before: Dresser

Before: Drawers

Before: Hardware

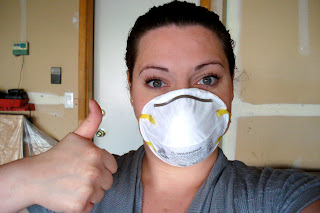
My sister-in law has painted several projects for her house so she volunteered to come over and help me out the first day.  We wiped the dresser down thoroughly then gave it a good sanding to smooth it out.  If you ever decide to tackle a project like this, make sure to wear a face mask to protect your lungs from the dust particles.  I was especially scrupulous about this as I am pregnant and didn't want the chemicals from the previous finish to wind up in my system.  

Since I didn't want to spend hours and hours sanding every little nook and cranny of the dresser, we used Zinsser Cover Stain (with the brown label), an oil based bonding primer to adhere to the stain.  We did one coat of the primer on all the drawers and two coats on the top of the dresser, as the top will be subject to more wear and tear.  We used high density foam rollers to apply the primer to the dresser base and a good ol' brush for the drawers.  Getting around that molding, however, on the drawers was a real pain in the butt.  I think if I were to do it over again I would use the spray on Zinsser instead.  It would have saved me so much time!  I let the primer dry for a good 24 hours.

Since there were a few drips and unevenness from the primer, I sanded the whole piece down with a fine sandpaper block, making sure it was nice and smooth (again wearing the face mask).  I then wiped it down with a soft, dry cloth and then again with a wet cloth to get rid of any dust.  Then it was time for the first coat of paint.  I used Benjamin Moore Advanced in plain White (I didn't bother getting it tinted at all).  
 Again, the drawers were super tedious to paint with a brush and it was quite difficult to get a super smooth finish.  I found that because it took so long to paint around the molding, the paint would dry too quickly and the brush would create drag marks in the paint.  So I had to do a lot more sanding after each coat than I had originally intended.  I did two coats of paint of the drawers and three coats on the base of the dresser, paying special attention to the top.  I would have done three coats on the drawers but they were annoying me too much so I gave up haha.  Now, when I did a little research on this project, it was recommended to follow the paint job with a couple of coats of polyurethane for durability.  However, when I bought my paint at the store, the lady there told me that with the particular paint I bought I wouldn't have to.  I'm not sure how right she is about that but I jumped at the chance to skip another step!  I may regret this decision in the future but hopefully not.

One thing I overlooked in the beginning of the project was finding new hardware to match the holes in the dresser drawers.  It turned out that after I had done all that work (sanding, priming, sanding, painting, sanding, painting etc...) the hardware from the dresser was a far cry from any standard size found at any local hardware store.  That mean I would have to go back with wood filler, fill the holes and repeat every step for the inlay.  I was not happy about this prospect but I was also not happy about the look of the hardware.  So I let the project sit for a few days while I pondered my options.  In the end I came up with the idea of spray painting the hardware a nice bright color.  It was going to go in a baby's room, right?  So a bit of whimsy is always nice, plus I was saving myself some money.  I settled on a nice bright blue spray paint and set to work.

 Again, I made sure to protect my lungs and the baby with a nice face mask!


 I let the hardware dry for 24 hours, reinstalled it, put the drawers back into the dresser and this is what I got!

I am definitely happy to be finished and am relatively pleased with the end product.  I cant wait to decorate the rest of the baby's room and see how the dresser looks in the space.  So keep tuned for some further nursery projects to come!

-J


Sunday, May 6, 2012

Funny Story

The other day my sister came over for a visit and while she parked her car she noticed a few items neatly placed on the driveway.  She brought the rain soaked items in and asked me if they were mine.  I looked over the day planner and accompanying clipboard with built-in calculator and quickly surmised that they were not.  I took a peak inside and found some business cards that belonged to an Old Dutch distributor.  So I called him up and left a message saying that I had some things of his.

A couple of days later he calls me back and explains that his truck was broken into and that some items of his were missing because of it.  We chatted a bit more and discovered that he only lives a block away from me.  Some punks must have absconded with his stuff only to discard the less useful items neatly on my driveway (at least they were a little considerate).  I had some errands to run that day but I left his stuff out on the bench on the front porch for him to pick up.  When I came home a few hours later from my errands his items were gone and, much to my surprise, in their place were two boxes filled with Old Dutch chips!  


While I certainly didn't expect to be rewarded for merely trying to return a stranger's possessions, I must admit, it was pretty nice to get some free stuff haha.  These chips will definitely come in handy during BBQ season!  

-J

Tuesday, May 1, 2012

Once More With Feeling

I posted a while back about having multiple miscarriages which is why I have waited quite a while to make the official announcement that I am, indeed, expecting again!  I am greatly relieved that everything is going well, that I am now 21 weeks and that - drum roll please - we are having another BOY!

I was convinced this baby was a girl because this pregnancy felt so different than the last but I was recently shown irrefutable evidence to the contrary and so cannot argue with science haha.  We couldn't be happier, though, and can't wait for the little guy to pop out in 5ish months (Sept 7th is the due date).

I still get quite paranoid at times but am trying to get over the anxiety that something will go terribly wrong.  I wouldn't be able to prevent it even if it did so...here we are...pregnant, emotional and getting "fatter" every week.  Did I ask for this?  Oh ya, I did!  Cheers!

-J     

Monday, April 30, 2012

Face Canvas

A couple of months ago, for some strange and unknown reason, I became a little obsessed with wanting to try my hand at face painting.  I know, right?  Random!  I've always had artistic proclivities, however, my brush strokes have consistently made their way onto primed and framed canvases.  So I decided to run with this new interest and merely transfer the canvas to the face!  I did a little researching online, bought a kit, watched some tutorials on YouTube and went to work practicing on all the wee children I could find, which wasn't difficult as I have many willing nieces and nephews.  What kid doesn't like their face painted?  My family all got together over the Easter weekend and I set to work with my paint set.  This is the result of my impulsive new hobby.


It was fun, although admittedly frustrating at times because those YouTube people make it seem so much easier than it actually is!  Haha.  But I'm working on my strokes and perhaps I will be able to paint faces just as fast and easily as the pros one day.  Or I may lose interest and only pull the paints out at family parties.  Only time will tell.  Anyone want their face painted?

-J

Cake Decorating Method

Hello my lovely followers/subscribers, who may be fewer and fewer these days since I'm a horribly infrequent poster, as many of my friends have pointed out!  I'm pleased to bring you a very simple, yet clever method of decorating cakes.  Although I cannot claim it as my own - I chanced upon a tutorial while web surfing and fell in love with this genius concept.  You can go to the tutorial here where it is explained just as well as I could explain it.  It's called frozen buttercream transfers and it's amazing, especially if you are not very artistic and/or too lazy to free hand a cool design.  I happen to be the latter!  I didn't take any pictures of the process but here is the finished product that I made for my son's birthday cake. 


This was the first time I tried doing a frozen buttercream transfer and it worked quite nicely.  Russell was very excited to dig in!  I'm sure the next time, it will be even better because I'll be more sure of what I'm doing and take a little more time to do some detailed line work.  

Happy cake decorating!

-J